30 Days of ML with Kaggle [Day 10]-Underfitting and Overfitting, Random Forests
오늘은 Day10이다! 오늘 Assignment를 잘 수행하면, 1/3이 지난다!
오늘도 열심히 해보자!
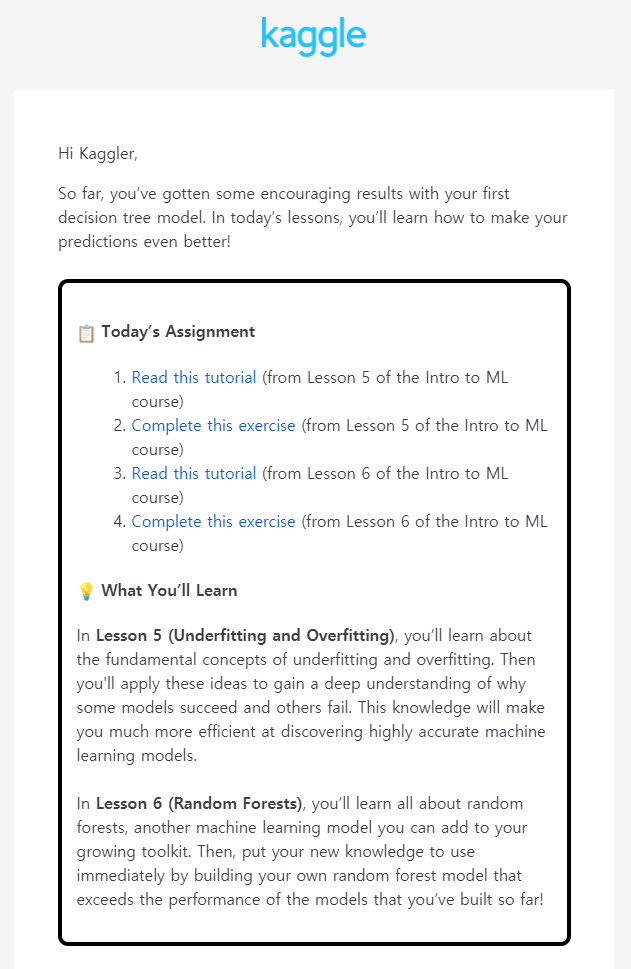
Today's Assignment - day 10
- Read this tutorial (from Lesson 5 of the Intro to ML course)
- Complete this exercise (from Lesson 5 of the Intro to ML course)
- Read this tutorial (from Lesson 6 of the Intro to ML course)
- Complete this exercise (from Lesson 6 of the Intro to ML course)
오늘은 Underfitting and Overfitting이라는 주제와, Random Forests model에 대해 알아보는 시간이다.
Experimenting With Different Models
지난시간에, 모델 정확도를 측정할 수 있는 신뢰할 수 있는 방법을 찾았으므로, 대체 모델을 실험하고, 어떤 모델이 최상의 예측을 제공하는지 확인할 수 있다. 그렇다면 모델에는 어떤 대안이 있을까?
scikit-learn의 문서에서 의사 결정 나무 모델에는 많은 옵션이 있음을 알 수 있다.
가장 중요한 옵션은 나무의깊이를 결정한다.
나무의 deepth는 예측에 도달하기 전에 얼마나 많은 분할을 수행하는지에 대한 척도라는 것을 기억하자.
아래 사진은 비교적 얕은 나무다.
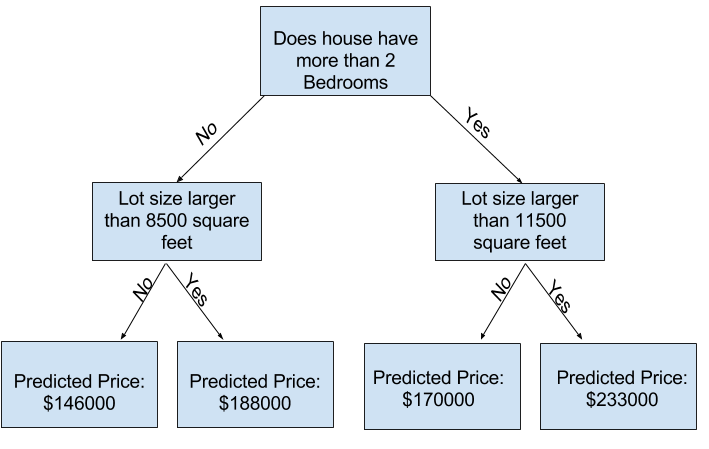
실제로 트리가 최상위와 leaf사이에 10개의 분할을 갖는 것은 드문 일이 아니다.
나무가 deep해질 수록 데이터 세트는 더 적은 leaf로 쪼개진다.
트리에 1개의 분할만 있는 경우 데이터를 2개의 그룹으로 나눈다. 만약 각 그룹이 다시 분할 된다면, 4개의 그룹이 생긴다. 각각을 다시 분할하면 8개의 그룹이 생성된다. 각 구준에 더 많은 분할을 추가하여 그룹 수를 계속 2배로 늘리면 10층에 도달할 때까지 210개의 집단이 생기게 된다. 1024장의 leaves다.
집을 여러 leaf(나뭇잎)으로 나눌 때, 우리는 각각의 잎에 더 적은 집을 갖게 된다.
매우 적은 수의 주택이 있는 잎은 해당 주택의 실제 값에 매우 가까운 에측을 하지만, 새 데이터에 대해서는 매우 신뢰할 수 없는 예측을 할 수 있다. (각 예측은 소수의 주택만을 기반으로 하기 때문)
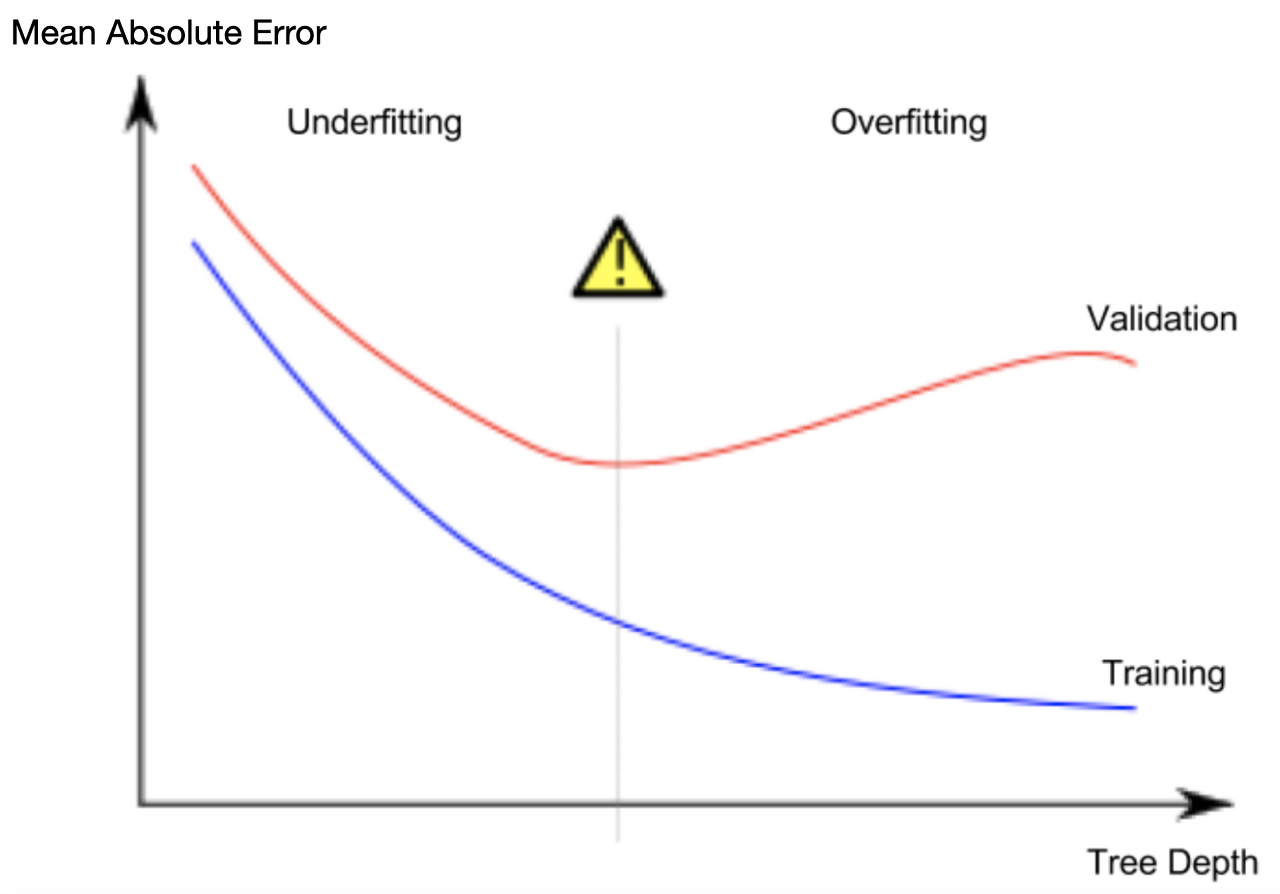
이는 "Overfitting"(과적함)이라고 하는 현상으로, 모델이 train_data와 거의 완벽하게 일치하지만 validation(유효성 검사) 및 기타 새로운 데이터에서는 제대로 예측되지 않는다.
반대로, 우리가 나무를 너무 얕게 만들면, 집들이 매우 뚜렷한 그룹으로 나눠지지 않는다.
극단적으로 나무가 집을 2~4개로 나눈다면 각 그룹에는 여전히 다양한 집이 있을 것이다.
train_data 에서도 대부분의 주택에 대해 결과 예측이 크게 어긋날 수 있다.(동일한 이유로 validation[유효성 검사]에서도 좋지 않을 수 있음)
모델이 데이터에서 중요한 구별과 패턴을 포착하지 못해 train_data에서도 성능이 저하되는 경우를 과소적합(Underfitting)이라고 한다.
우리는 validation_data에서 추정하는 새 데이터의 정확도에 관심을 갖기 때문에 과소적합과 과적합 사이의 sweet spot을 찾고 싶다. 시각적으로 우리는 아래 그림에서 (빨간색) validation 곡선의 낮은 저점을 원한다.
Example
트리의 깊이를 조절할 수 있는 몇가지 대안이 있으며, 대부분의 경우 트리를 통과하는 일부경로가 다른 경로보다 더 깊은 깊이를 가질 수 있다. 그러나 max_leaf_nodes 인수를 사용하면 과적합 대 과소적합을 매우 합리적으로 제어할 수 있다. 모델이 더 많은 잎을 만들수록 위 그래프의 underfitting영역에서 overfitting 영역으로 더 많이 이동한다.
유틸리티 함수를 사용하여 max_leaf_nodes에 대해 서로 다른 값의 MAE 점소를 비교할 수 있다.
max_leaf_nodes:
from sklearn.metrics import mean_absolute_error
from sklearn.tree import DecisionTreeRegressor

def get_mae(max_leaf_nodes, train_X, val_X, train_y, val_y):
    model = DecisionTreeRegressor(max_leaf_nodes=max_leaf_nodes, random_state=0)
    model.fit(train_X, train_y)
    preds_val = model.predict(val_X)
    mae = mean_absolute_error(val_y, preds_val)
    return(mae)
데이터는 아래의 코드처럼 이미 봤던 코드를 이용하여 train_X, val_X, train_y 및 val_y에 로드된다.
# Data Loading Code Runs At This Point
import pandas as pd

# Load data
melbourne_file_path = '../input/melbourne-housing-snapshot/melb_data.csv'
melbourne_data = pd.read_csv(melbourne_file_path)
# Filter rows with missing values
filtered_melbourne_data = melbourne_data.dropna(axis=0)
# Choose target and features
y = filtered_melbourne_data.Price
melbourne_features = ['Rooms', 'Bathroom', 'Landsize', 'BuildingArea',
                        'YearBuilt', 'Lattitude', 'Longtitude']
X = filtered_melbourne_data[melbourne_features]

from sklearn.model_selection import train_test_split

# split data into training and validation data, for both features and target
train_X, val_X, train_y, val_y = train_test_split(X, y,random_state = 0)
for-loop를 사용하여 max_leaf_nodes에 대해 서로 다른 값으로 빌드된 모델의 정확도를 비교할 수 있다.
# compare MAE with differing values of max_leaf_nodes
for max_leaf_nodes in [5, 50, 500, 5000]:
    my_mae = get_mae(max_leaf_nodes, train_X, val_X, train_y, val_y)
    print("Max leaf nodes: %d  \t\t Mean Absolute Error:  %d" %(max_leaf_nodes, my_mae))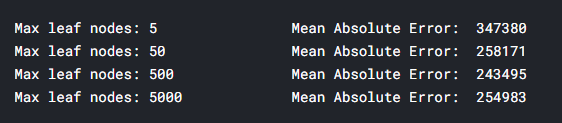
나열된 옵션 중에 500개가 최적의 leaf수 이다.
Conclusion
요점은 다음과 같다. 모델은 다음 중 하나에 해당할 수 있다.
- Overfitting: 미래에 반복되지 않을 가짜 패턴을 포착하여 예측이 덜 정확하다.
- underfitting: 관련 패턴을 포착하지 못하여 예측이 정확하지 않다.
모델 훈련에 사용되지 않는 validation_data를 사용하여 후보 모델의 정확도를 측정한다.
이를 통해 많은 후보 모델을 시도해보고, 최상의 모델을 유지할 수 있다.
underfitting과 overfitting 관련 예제를 수행한 코드를 공유한다.
https://github.com/mgkim-developer/30-Days-of-ML-with-Kaggle/blob/main/30-days-of-ml-day-10-overfitting.ipynb
GitHub - mgkim-developer/30-Days-of-ML-with-Kaggle: 30 Days of ML with Kaggle
30 Days of ML with Kaggle. Contribute to mgkim-developer/30-Days-of-ML-with-Kaggle development by creating an account on GitHub.
github.com
이번에는 Random Frests 관련 내용이다.
Random Forests
Introduction
의사결정 나무는 당신에게 어려운 결정을 남긴다. 잎이 많은 깊은 나무는 각가의 예측이 잎에 있는 몇 채 안되는 집의 역사적 데이터로부터 나오기 때문에, Overfitting된다.
그러나 잎이 거의 없는 얕은 나무는 원시데이터에서 많은 구별을 포착하지 못하기 때문에 성능이 저하된다.
오늘날 가장 정교한 모델링 기술도 underfitting과 overfitting 사이에 직면해 있다.
하지만 많은 모델들이 더 나은 성능을 이끌어 낼 수 있는 기발한 아이디어를 가지고 있다.
Random Forest(랜덤포레스트)를 예로 들어 보겠다.
랜덤포레스트는 많은 트리를 사용하며 각 구성 요소 트리의 예측을 평균화하여 예측한다.
일반적으로 단일 의사결정 트리보다 예측 정확도가 훨씬 높고 기본 파라미터에서도 잘 작동한다.
모델링을 계속하면 더 나은 성능으로 더 많은 모델을 학습할 수 있지만, 그중 많은 모델이 올바른 매개변수를 얻는 데 민감하다.
Example
이미 활용했던 데이터 로드 코드를 이용하여 데이터 로드가 끝나면 다음 변수가 있다.
- train_X
- val_X
- train_y
- val_y
import pandas as pd

# Load data
melbourne_file_path = '../input/melbourne-housing-snapshot/melb_data.csv'
melbourne_data = pd.read_csv(melbourne_file_path)
# Filter rows with missing values
melbourne_data = melbourne_data.dropna(axis=0)
# Choose target and features
y = melbourne_data.Price
melbourne_features = ['Rooms', 'Bathroom', 'Landsize', 'BuildingArea',
                        'YearBuilt', 'Lattitude', 'Longtitude']
X = melbourne_data[melbourne_features]

from sklearn.model_selection import train_test_split

# split data into training and validation data, for both features and target
# The split is based on a random number generator. Supplying a numeric value to
# the random_state argument guarantees we get the same split every time we
# run this script.
train_X, val_X, train_y, val_y = train_test_split(X, y,random_state = 0)
scikit-learn에서 의사결정 트리를 구축한 방법과 유사하게 랜덤포레스트 모델을 구축한다.
이번에는 DecisionTreeRegressor 대신 RandomForestRegressor 클래스를 사용한다.
from sklearn.ensemble import RandomForestRegressor
from sklearn.metrics import mean_absolute_error

forest_model = RandomForestRegressor(random_state=1)
forest_model.fit(train_X, train_y)
melb_preds = forest_model.predict(val_X)
print(mean_absolute_error(val_y, melb_preds))
Conclusion
추가 개선의 여지가 있지만, 이는 최대 250000의 의사결정트리 오류에 비해 크게 개선된 것이다.
single decision tree(단일 의사결정트리)의 최대 깊이를 변경했으므로 Random Forest의 성능을 변경할 수 있는 매개변수가 있다.
그러나 Random Forest모델의 가장 좋은 기능 중 하나는 이러한 튜닝 없이도 일반적으로 합리적으로 작동한다는 것이다.
Random Forest를 수행한 예제코드를 공유한다!
https://github.com/mgkim-developer/30-Days-of-ML-with-Kaggle/blob/main/30-days-of-ml-day-10-random-forest.ipynb
GitHub - mgkim-developer/30-Days-of-ML-with-Kaggle: 30 Days of ML with Kaggle
30 Days of ML with Kaggle. Contribute to mgkim-developer/30-Days-of-ML-with-Kaggle development by creating an account on GitHub.
github.com
'AI > Kaggle 30 Days of ML' 카테고리의 다른 글
| Kaggle Intro to Machine Learning Certificate (0) | 2021.08.14 |
|---|---|
| 30 Days of ML with Kaggle [Day 11]-Machine Learning Competitions (0) | 2021.08.14 |
| 30 Days of ML with Kaggle [Day 9]-Your First Machine Learning Model, Model Validation (0) | 2021.08.11 |
| 30 Days of ML with Kaggle [Day 8]-How Models Work, Basic Data Exploration (0) | 2021.08.10 |
| Kaggle python Course Certificate (0) | 2021.08.10 |