스프링 MVC 2 - 프로젝트 생성
반응형
프로젝트 생성
사전 준비물
- Java 11 설치
- IDE: IntelliJ 또는 Eclipse 설치
스프링 부트 스타터 사이트로 이동해서 스프링 프로젝트 생성
https://start.spring.io
- 프로젝트 선택
- Project: Gradle Project
- Language: Java
- Spring Boot: 2.5.x
- Project Metadata
- Group: hello
- Artifact: thymeleaf-basic
- Name: thymeleaf-basic
- Package name: hello.thymeleaf
- Packaging: Jar
- Java: 11
- Dependencies: Spring Web, Lombok, Thymeleaf
build.gradle

- 동작 확인
- 기본 메인 클래스 실행(ThymeleafBasicApplication.main())
- http://localhost:8080 호출해서 Whitelabel Error Page가 나오면 정상 동작
홈 화면
/resources/static/index.html


실행
http://localhost:8080/
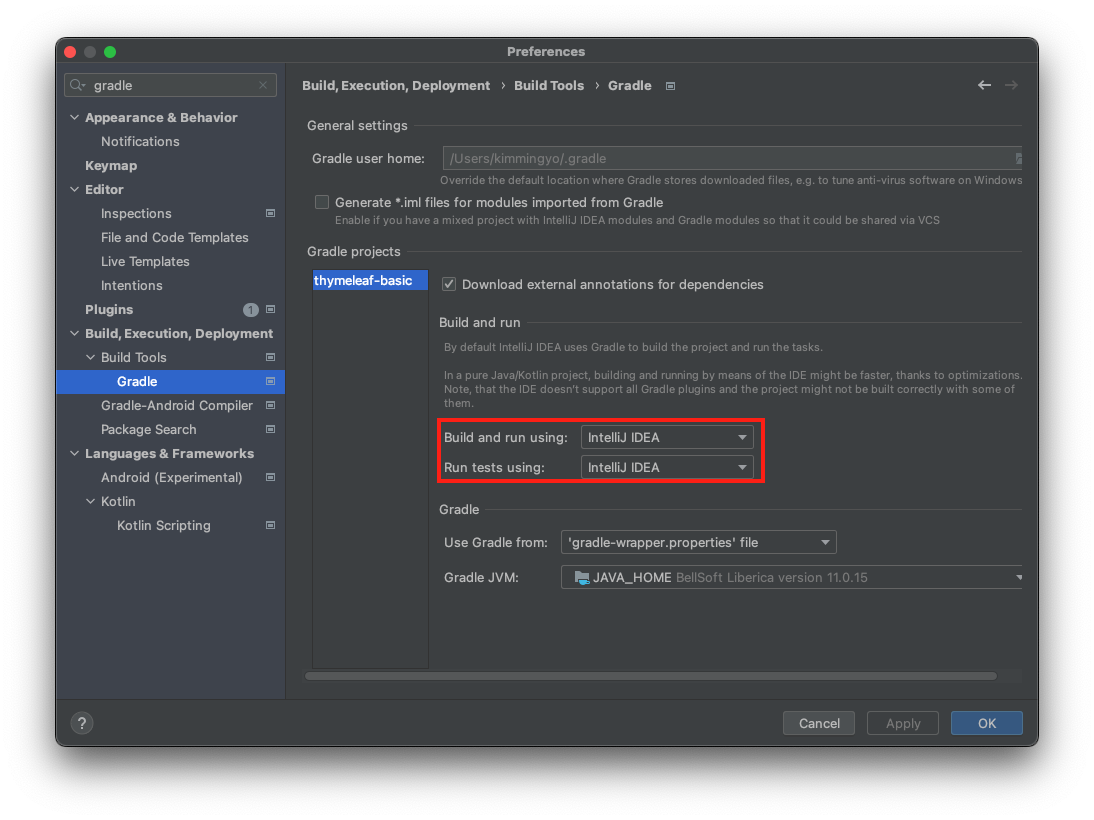
Intellij Gradle 대신에 자바 직접 실행
최근 Intellij 버전은 Gradle을 통해서 실행 하는 것이 기본 설정이다. 이렇게 하면 실행속도가 느리다.
다음과 같이 변경하면 자바로 바로 실행해서 실행속도가 더 빠르다.
- Preferences → Build, Execution, Deployment → Build Tools → Gradle
- Build and run using: Gradle → Intellij IDEA
- Run tests using: Gradle → Intellij IDEA
롬복 적용
- Preference → plugin → lombok 검색 실행(재시작)
- Preference → Annotation Processors 검색 → Enable annotation processing 체크 (재시작)
- 임의의 테스트 클래스를 만들고 @Getter, @Setter 확인
Postman을 설치하자
다음 사이트에서 Postman을 다운로드 받고 설치해두자
반응형
'Spring' 카테고리의 다른 글
| 스프링 MVC 2 - 텍스트 - text, utext (0) | 2022.08.03 |
|---|---|
| 스프링 MVC 2 - 타임리프 소개 (0) | 2022.08.03 |
| 스프링 MVC 1- 정리(스프링 MVC - 웹 페이지 만들기) (0) | 2022.08.01 |
| 스프링 MVC 1 - RedirectAttributes (0) | 2022.08.01 |
| 스프링 MVC 1 - PRG Post/Redirect/Get (0) | 2022.08.01 |